Monday, March 29, 2010

Biscuits with Blueberry Compote

Yesterday morning I wanted something a little different for breakfast, so I decided to make biscuits.  I also remembered I had some blueberries in the freezer and wanted to make something with them to put on the biscuits to make things a little more special.

For the biscuits I went to my Fannie Farmer Cookbook.  These were so easy and quick to make it's almost silly, and they were oh so good.

Baking Powder Drop Biscuits

2 cups flour
1/2 teaspoon salt
4 teaspoons baking powder
1 tablespoon sugar
1/2 cup cold butter (original recipe calls for vegetable shortening, but I prefer butter)
1 cup milk

Preheat your oven to 425 degrees Fahrenheit.  Mix all of the dry ingredients together in a bowl. 


Then cut the butter in using a pastry cutter or two knives.  For this step it helps if you chop the butter into small chunks before adding it to the dry ingredients. 


 You don't want to create a paste, just kind of a coarse texture where the butter is broken into small pieces. 


Then add the milk all at once and stir until just combined. 


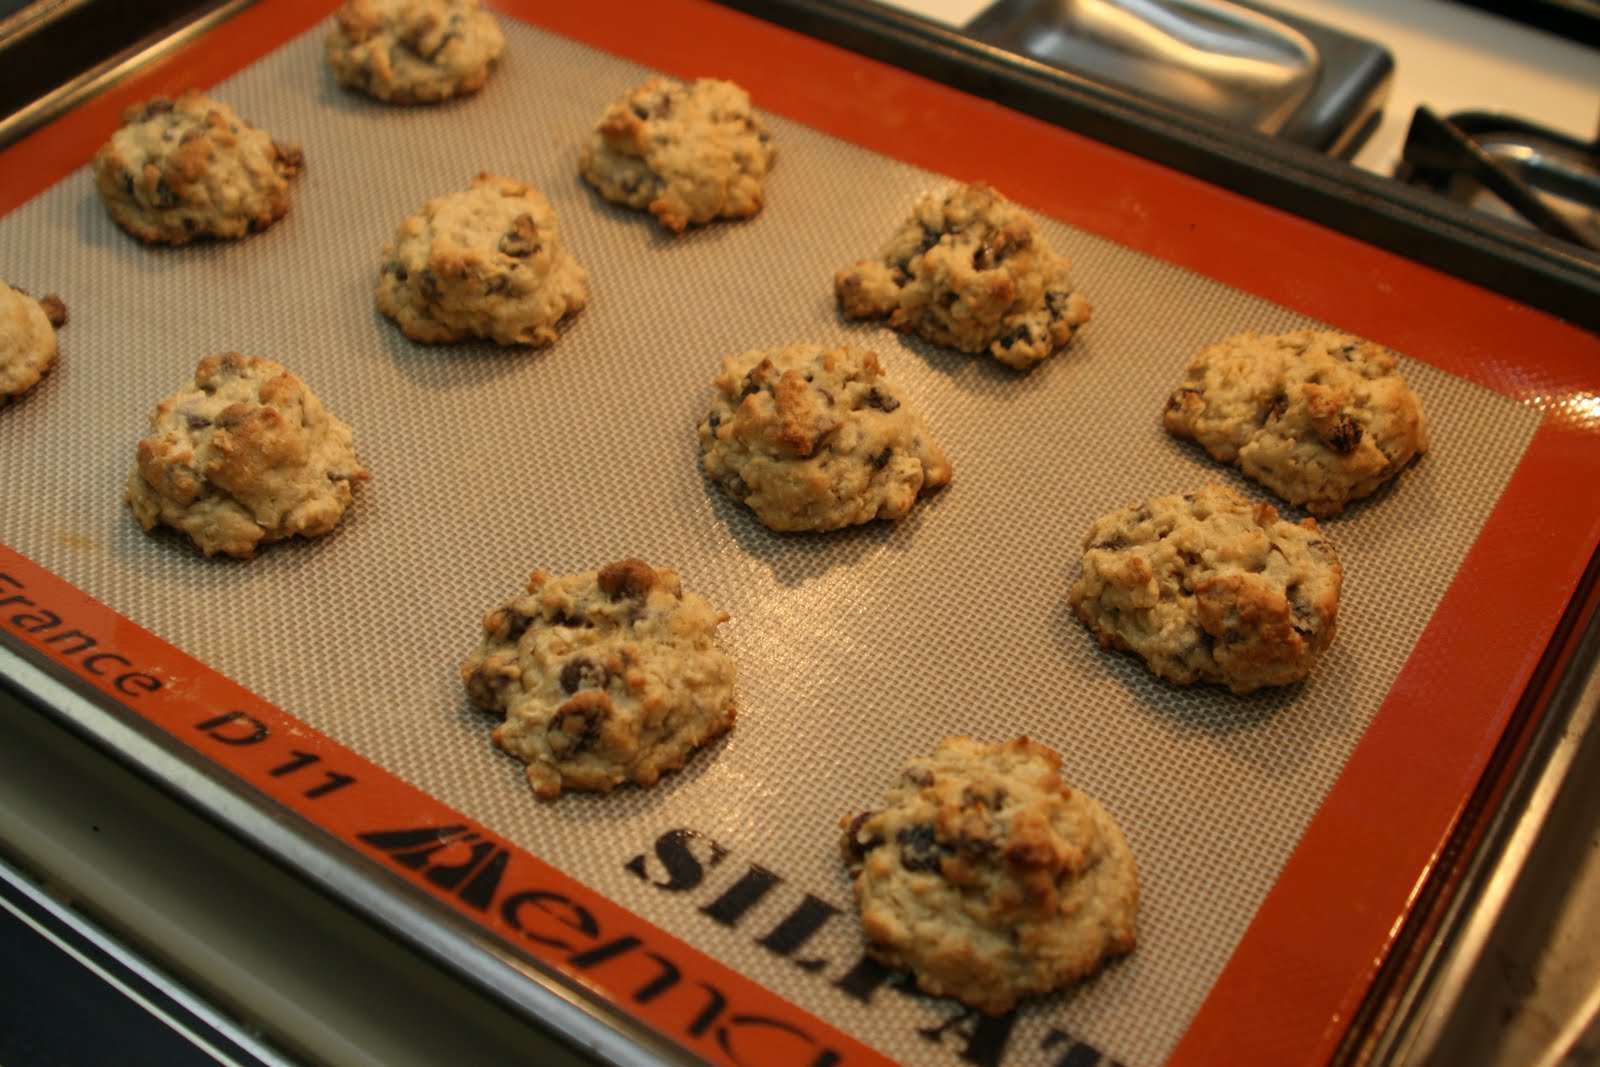
You can see that the dough isn't perfectly smooth and there are visible chunks of butter.  That's what makes the biscuits so tender!  Drop by large spoonfuls onto a cookie sheet.  I used my trusty Silpats to make sure they wouldn't stick to the cookie sheet at all.


Bake for about 10 minutes.  Done!  Makes around a dozen biscuits.


While the biscuits were baking I got started on a blueberry compote that I whipped up on the fly and turned out great.

Blueberry Compote

2 cups frozen blueberries, divided
1/3 cup water
1/2 cup sugar
2 tablespoons orange juice
generous dash nutmeg
generous dash cinnamon

Put 1 cup of the blueberries (no need to thaw), the water, sugar, juice  and spices into a small pot over medium heat. 


Be sure to keep an eye on this and stir periodically as it boils to keep anything from burning.  After around 5 minutes I smashed the berries a bit with the spoon I was stirring with to thicken it a little. 


Continue heating and stirring for another 5 minutes and then add the rest of the blueberries.  Keep heating and stirring that for another 5 to 10 minutes.  That's it!


Now put a biscuit on a plate, cut it in half and ladle in some of that blueberry goodness.


Mmmm, delectable.

Sunday, March 28, 2010

Oatmeal Chocolate Chip Raisin Cookies

This recipe is an old one but a good one.  They are the cookies that my mom would make when my brother and I were growing up (and still makes them now).  They have also become my standby I-need-to-bake-something-for-this baked good.

These cookies are no fuss, reliably turn out tasty and are always a crowd pleaser (unless you're a certain one of my friends who has "texture issues" with raisins in cookies in which case I will bastardize the recipe and leave the raisins out even though I think they really make the cookies, but I digress).

According to the recipe that my mom has, this is a Mrs. Field's recipe, but I don't really have any way of confirming it since it was copied down by a friend of hers over 20 years ago.

Here's what you'll need to make my Oatmeal Chocolate Chip Raisin Cookies:

1 cup butter, softened
1 cup white sugar
1 cup brown sugar

2 eggs
1 teaspoon vanilla

2 cups flour
3 cups oatmeal
1/2 teaspoon salt
1 teaspoon baking soda
1 teaspoon baking powder

1 1/2 cups chocolate chips
1 1/2 cups raisins

Before you start making the cookie dough, turn your oven on so it can preheat to 350 degrees Fahrenheit.

Put the butter and sugars into a large mixing bowl and then cream them together.  


I like to crack my eggs into a glass before adding them so I can be sure that no shell has fallen in.  After I do that, I can add the eggs and vanilla and mix well.


At this point most recipes tell you to mix all the dry ingredients together before gradually adding them to the wet.  But I have tried this recipe by doing that and also by just dumping them all into the mixing bowl at once and quite frankly, for this recipe you cannot tell the difference.  So save yourself another dirty bowl and go ahead and add the flour, oatmeal, salt, baking soda and baking powder to your wet ingredients and mix until combined.


Add the chocolate chips and raisins; I like to do one and then the other.  I like my cookies loaded, so if you like more cookie and less chocolatey/raisiny goodness, go ahead and add less.  I don't know why you would, but it's your kitchen and you can do whatever you want.  And I'll do whatever I want, and I want a lot.

Go ahead and eat some dough, you know you want to!

Drop spoonfuls of the cookie dough onto an ungreased cookie sheet.  I like to use my cookie dough scoop largely because it gives me consistently sized cookies. 


And I like to use my Silpats on my cookie sheets because it prevents any sticking.  It also makes the cookies bake more evenly in my runs-kind-of-hot-especially-in-one-corner-but-mostly-from-the-bottom-so-it's-easy-to-burn-stuff-on-the-bottom-before-it's-cooked-on-the-top oven.  I have noticed that the Silpats create a cookie that puffs up more instead of spreading out a bit, so if you want your cookie flatter, smoosh them down a bit if you're using one.  And if you'r not using one just be forewarned that your cookie will be a little flatter, but no less delicious and will still come off the cookie sheet with ease.

Now pop those suckers in the oven.  Mine were done in 6 minutes, but your baking time may very depending on your oven.  I also like my cookies to be nice and chewy, so if you want it crisper bake it longer.


 Nice and gooey

This recipe yields about 5 dozen cookies, and while that sounds like a lot, they don't last long in our house or at parties.  So hurry up and grab a glass of milk while the cookies are warm before your family eats them all without you!

Wednesday, March 24, 2010

Corned Beef and (just a little) Cabbage

This St. Patrick's Day I made a last minute decision to make corned beef at home.  I was quite pleased with how it turned out, as were Thomas and some of our friends, but I definitely have some ideas as to how I'll tweak it to make even better.


I got the idea for this recipe here.

What you need:

6 qt crock pot

3ish lbs brined corned beef brisket (I bought mine from my local butcher) and the little spice packet that comes with it
1 cup light brown sugar
24 oz guinness beer (I didn't have any on hand, so I used a stout and a dark ale)
3 sweet onions
1 cup chopped green cabbage
3 lbs baby red potatoes
2 cups baby carrots (which I forgot to add, woops!)

Mix together the sugar and spice packet. 


Pat the brisket dry with some paper towel and then rub the sugar and spice mixture all over the meat.  Place the meat in the crock pot


and then pour the beer in to cover it. 


Since I was running short on time I set my crock pot on high for 2 hours and then turned it down to low for a few more hours.  Next year I'll just set it to low for  6-8 hours.

While that's cooking I've got more than enough time to peel my onions and cut them in half, quarter the potatoes and chop up a little cabbage.  I don't actually like cabbage, but added some because it's traditional and whatnot.  I added my potatoes, onions and cabbage (and should have added the carrots but forgot!) about an hour before the meat was done cooking. 


Next time I'll add them closer to 2 hours before because I didn't think they were done enough after one hour and ended up leaving them in longer.

When the meat is done cooking, pull it out of the crock pot and let it rest for 10 minutes before slicing it. 


Then pile some onto your plate along with everything left in the crockpot and enjoy!  Seriously, that's it!  Easy, right?


It came out super delicious.  I was worried initially that everything would taste like beer, but it didn't (good news for those of us who don't actually like beer!).  Next time I'm going to put the remaining liquid in another pot to reduce and thicken it after everything is done cooking.  The sauce was fabulous but very thin, so this would make it that much better.

With a recipe this simple, you won't even need the Luck o' the Irish to ensure a festive and tasty meal!

Sunday, March 21, 2010

Dave is home!

In his forever home, that is.  It's exactly the type of home I wanted for him.  The family has a dog, two kids, a fenced in yard and they weren't phased by the idea that Dave may have had a head injury.  Their bouncy yellow lab that's just a little bit younger than Dave was all wags when we arrived for their home check, and when we introduced them it was love at first sight.  After the requisite sniffing they starting running around the yard playing chase and having fun as if they had been friends forever.  The kids and Dave had already taken to each other when they met yesterday.  Dave gives them kisses and then rolls over so they can give him tummy rubs, and they happily oblige.  And of course his new mom and dad are totally smitten.  I could not be more thrilled about the family that adopted Dave.  More importantly, Dave is thrilled about his new family.

Wednesday, March 17, 2010

Chatterboxes

Springtime is here!  This morning it's warm enough to open the front door and let the critters see the world through the storm door (one of their favorite past-times). 

In fact, they love it so much that our neighbors notice.  Last year we let our foster dog at the time watch us do some yard work through the door.  A woman walking by looked at our house and upon seeing a dog at the door asked, "What happened to the orange cat?".  She was relieved to find out he was taking a nap and still enjoys his post at the door. 


Right now Lenny and Waldo are enjoying watching the birds fly by and people walk their dogs.  When a bird gets especially close they start chattering (adorable squeaky noises), a common hunting technique in the feline world.  I don't have the heart to tell them that they can't catch the birds through the door when they try and pounce, but I also don't have the self control not to laugh when they try.  Either way, we're all enjoying having a little extra sunshine in the room.

Tuesday, March 9, 2010

Super Simple Stir Fry

This is one of my go to meals when I'm either in a hurry or want to pack in a lot of veggies if I feel like I've been slacking in the healthy eating department.  It's really easy but has great flavor.

1/2 pound chicken, pork or beef, cut into bite size pieces
1 tablespoon oil
2 cups broccoli florets
1 cup sliced baby carrots
1 cup sliced mushrooms
1/2 cup sliced red pepper (I didn't have any on hand today)
2-3 tablespoons teriyaki sauce
1/4 cup soy sauce (I use reduced sodium kikkoman)
1/4 water

Start by marinating the meat in the teriyaki sauce (I used pork this time, but have used chicken and beef as well and they all turn out yummy).  You can let it marinate in the fridge for several hours, or if you're in a pinch you can skip the marinating step and just add the teriyaki sauce and meat to the pan at the same time.

Heat the oil in a large frying or sauce pan (or wok if you're super fancy) on medium heat.  Once the oil is hot, add the marinated meat and any remaining teriyaki sauce that hasn't been absorbed yet.  Stir frequently so that the meat cooks evenly.  Once the meat is cooked through, remove from pan and set aside in a bowl.

Almost done cooking!

Next, put all of the veggies to the pan you were just cooking the meat in.  Add the soy sauce and water.  Cover pan so veggies can steam.  Check veggies every few minutes with a fork until they reach your desired level of tenderness (I like mine firm but not crunchy).

Mmmm....look at all that healthy goodness!

Add the meat back into the pan and stir everything around until the meat is heated thoroughly.

 
Serve over udon noodles or rice.  If serving with udon noodles I recommend thickening the sauce.  To do this I add 1 tablespoon of cornstarch mixed with 1-2 tablespoons of cold water to the pan.  Let the sauce boil for one minute.  This helps the sauce stick to the noodles better.  No need to thicken if using rice; the rice will absorb the sauce on its own.

The Cone of Shame

Today Dave lost his manhood, but more than that, he lost a little bit of his dignity.  Since I promised Dave I wouldn't show the other dogs, please have your four legged friends avert their eyes from the screen for the moment.

And behold, The Cone of Shame:


Okay, it's actually called an Elizabethan collar (E-collar for short).  But I'm pretty sure dogs use words to describe it that none of our grandmothers would like to hear us say, so we'll leave it at that.  It's to keep him from licking or biting at the incision from his neutering to help make sure he won't get an infection.  Dave is still pretty drugged up right now, as evidenced by his tongue's attempted escape from his mouth.


After some pain meds, a little dinner and a good night's sleep he'll be feeling much better by tomorrow.  He'll get the hang of walking around with this contraption on his head pretty soon, too.  Until then I'll just have to stifle my giggles when he gets stuck going around corners or sniffing the floor.


Get well soon, Dave!

Monday, March 8, 2010

I've been framed!

I got the supplies for this project months ago but just never got around to it.  The other night I was feeling a little restless and wanted to do something productive (without doing housework) and thought this would be perfect.  The plan is to make some picture frames to put up in our main bathroom.

I started with some plain picture frames with raw wood.  I got these from Hobby Lobby for $3 each.  I wanted to create some texture on them, so I cut up some strips of paper using my paper cutter (totally could have used scissors or even just ripped the paper, but I love my paper cutter and will take any excuse to use it).  To put it all together I used Mod Podge.

Getting started

I mixed Mod Podge and water at a 1:1 ratio in a large container.  There was probably 1/8 cup of Mod Podge, but I just eyeballed it, and ended up adding a little bit more later.  It doesn't need to be perfect.  I stirred it up and then added the strips of paper.  I scrunched each one before tossing it in the bowl so they wouldn't be so totally stuck together.

 
Then I mixed it all around the make sure the paper was totally coated.

Take a strip, scrunch it a little and place it on the frame.  Keep going until the whole thing is covered (don't forget about the inside and outside edges!).  Let it dry.


Apply a coat of Mod Podge using a paint brush (don't add any water this time) over the whole thing to seal the paper and make sure it's all stuck together.

 
After that dried (you'll know it's dry because the Mod Podge will be clear) I flipped the frame over to trim some of the edges that I had folded underneath so the glass will fit properly when I put it all back together.

See how sloppy it is?

I used my rotary cutter (thanks Mom and Dad!), but a utility razor or exacto knife would work equally well to get the job done.

Now it's neat and clean

Now it's time to paint!  I picked a metallic silver paint. I ended up doing 3 coats, rotating the frame each time to make sure all of the nooks and crannies were nicely painted.


My original plan was to put some pictures of the hubs and I getting ready for our wedding in these frames (there's a great picture of me flossing and one of Thomas adjusting his tie in a mirror).  But since this bathroom is the main one for the house I was told this could be weird for people who aren't us, so instead I used some cute note cards. 


Ta-da!  Adds a little pizazz to the room, don't you think?

Saturday, March 6, 2010

Macarrones

After enduring the front row of a concert with me (post coming soon) I decided that the least I could do would be make one of Thomas' favorite meals for dinner.

Macarrones is a very typical pasta dish in Spain.  It's super tasty and also super easy to make.

You'll need:

1-2 tablespoons olive oil
a few large slices of onion
2 cloves of garlic
1 15 ounce can tomato sauce
1 teaspoon sugar
1 teaspoon salt
1 pound (or so) of ground beef
8 ounces (dry) penne noodles
parmesan cheese

If it looks like there's more of all of this in my pictures, it's because there is.  One of Thomas' co-workers joined us for dinner, so I doubled everything because I wanted to be sure there was enough (even though the quantities above usually makes around 3 servings).

In a large pot begin heating water to boil the pasta.

Heat olive oil, slices of onion and garlic on low heat in a large pan.  When it becomes aromatic, add the tomato sauce, sugar and salt.  Stir to make sure that everything is mixed together well.  A splatter guard comes in handy while the sauce is cooking to keep everything from getting splattered with tomato sauce.

You can sort of see the garlic and onion in with the tomato sauce, and you can see the (still clean) splatter guard in the background

Put another frying pan over medium heat.  Cook the ground beef until browned through, using a spatula to break it apart into very small pieces.  Be sure not to let the meat sit in a position too long so it won't burn and so it will cook evenly.


Drain the fat from the meat and add the meat to the tomato sauce mixture.  Stir it all together.

See all the sauce on the splatterguard?  That would have been all over the stove (and me!) if I didn't keep it over the pan

At this point your water pot should be boiling, so toss the pasta into the pot.  In the meantime stir the sauce once in a while.  Before the pasta finishes cooking, remove the onion and garlic from the sauce.

When the pasta finishes cooking strain it and either put it into the pan with the sauce (only if it is oven safe) or into a large oven-safe dish and mix it together until all of the noodles are coated with the sauce.

With some parmesan cheese sprinkled on top

If you want, go ahead and eat it now.  Or if you want it to be even tastier, do this:

Sprinkle parmesan cheese on top and pop into the oven.  If your pot or dish is broiler safe, go ahead and broil it until the cheese is browned.  Otherwise set the oven to 350-400 degrees Farenheit and bake until cheese is nicely browned.


Time to eat!